Xamarin Android - A Staggered Grid Layout, via a RecyclerView. And no Java bindings!
At the end of my previous blog post, about improving your scrolling performance using a view holder, I said I’d show you how to build a staggered grid layout, pretty much the same way that Pinterest does on their website.

The source code for the app in this article is over on GitHub. Note that it’s in a staggered-grid branch of the orginal, next to the add-viewholder branch from the previous post. I did it this way so that you can refer to all three, and compare the differences between them.
Personally I think it looks nicer than a strictly regimented set of tiles running vertically and horizontally, like you’d find in a regular grid. It means you don’t have to worry about some items overlapping other items, or having big gaps between some items, or having to ensure that your images and descriptions are limited to specific sizes and lengths.
In my opinion, it also just seems to flow more naturally.
Google not-so-recently introduced something called a RecyclerView, and if you’re using something pre-Lollipop, you can get to it via one of their ‘Support Library’ packages (Xamarin.Android.Support.v7.RecyclerView).
If you’ve been following along from the previous post, then you’ve probably already got an idea, just by looking at the name, of how this new component works.
Why a RecyclerView? What’s wrong with the way things were?
Different kinds of views which involved displaying multiple items (e.g. ListView, GridView) all had to implement the same kind of view-recycling functionality, as well as implementing their own ways of displaying data. This worked, but it means an awful lot of similar code being written over and over for every different kind of view, with slight differences and corner cases and idiosyncracies in each one.
Google has taken a step back, and redone this. Now there’s only one kind of view, which can be coded pretty much exactly the same way for all data sets (generally speaking). All it has to do now is specialise in loading and recycling existing data items. The actual layout of your items has now been pushed down into a LayoutManager abstract, so now you get things like LinearLayoutManager and (you guessed it) StaggeredGridLayoutManager.
OK, enough with the wall of text. Let’s see some code.
Install the RecyclerView Component
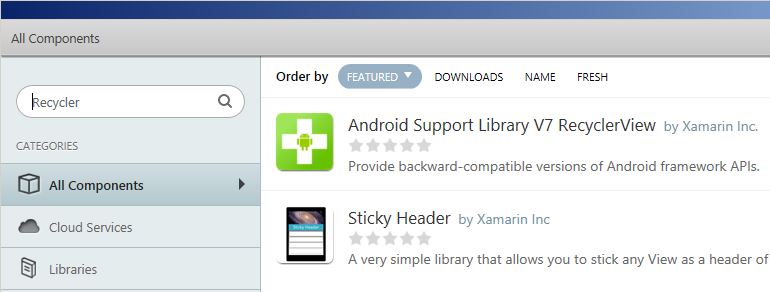
First things first, we need to add the Xamarin.Android.Support.v7.RecyclerView component from the Xamarin store:

This will also install the Xamarin.Android.Support.v4 package, via NuGet.
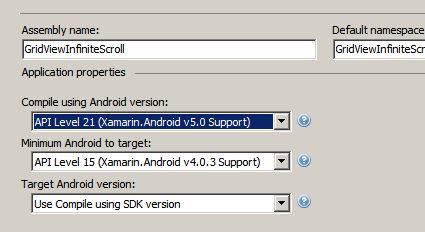
If you have problems installing the component, or it complains that some package dependencies weren’t downloaded, ensure that you’re NOT using the ‘Use Latest Platform’ selection in your ‘Compile Using Android version:’ setting in your project. Set it, instead, to a specific API level (21 is recommended), you can leave the other targets as they are.

Swap out the GridView you were using in the Main.axml (some GridView attributes removed for brevity):
<RelativeLayout>

<GridView
android:id="@+id/gridView"
android:layout_width="fill_parent"
android:background="#020202" />

</RelativeLayout>
for the RecyclerView:
<RelativeLayout>

  <android.support.v7.widget.RecyclerView
      android:id="@+id/recyclerGridView"
      android:scrollbars="vertical"
      android:layout_width="match_parent"
      android:layout_height="match_parent"
      android:verticalSpacing="8dp" />

</RelativeLayout>
(you can play with some of the other attributes on your own, this is about as simple as it gets)
Then add a new class inheriting from RecyclerView.Adapter (I called it MyRecyclerAdapter). This will replace the MyGridViewAdapter we used previously.
All this MyRecyclerAdapter does is create ViewHolder objects which correspond to your data items, and give you a place to bind their ‘control’ or ‘view’ properties to the values within your data items.
Add a constructor which allows you to access the MySimpleItemLoader object we created previously. That way we can access the data items we’ve loaded. Also, add overrides for the ItemCount property, and OnCreateViewHolder, OnBindViewHolder and GetItemViewType methods:
public class MyRecyclerAdapter : RecyclerView.Adapter
{
    private readonly MySimpleItemLoader _mySimpleItemLoader;

    public override int ItemCount
    {
        // get - snip
    }

    public MyRecyclerAdapter(MySimpleItemLoader mySimpleItemLoader)
    {
      _mySimpleItemLoader = mySimpleItemLoader;
    }

    public override RecyclerView.ViewHolder OnCreateViewHolder(ViewGroup parent, int viewType)
    {
    }

    public override void OnBindViewHolder(RecyclerView.ViewHolder holder, int position)
    {
    }

    public override int GetItemViewType(int position)
    {
    }

}
Tell the ItemCount property to simply return the number of items we have in our MySimpleItemLoader:
public override int ItemCount
{
  get { return this._mySimpleItemLoader.MySimpleItems.Count; }
}
Tell GetItemViewType to give you an integer value back, which you can then use to determine what specific type of view you’ll be creating or inflating, to display your data item:
public override int GetItemViewType(int position)
{
  if (_mySimpleItemLoader.MySimpleItems[position].GetType() == typeof(MySimpleItem))
  {
    return 0;
  }
  return 0;
}
Yes, it’s a little contrived, but this integer can be any value you like, and is the viewType value that the adapter will pass in to the OnCreateViewHolder method for you.
It’s up to you to use that value, to create (or inflate) the view you need to display your item’s data. It could also be an enum. Or, the Layout resource ID of the view you want to inflate. Or anything else. It’s up to you.
Sometimes you’ll also have more than one item type in your list. In our case, we just have one kind of item (a MySimpleItem), but this can easily be extended to as many different kinds of items as you like.
You can then flesh out the OnCreateViewHolder method, to tell it which view type to inflate, based on the integer you chose for that kind of data item:
public override RecyclerView.ViewHolder OnCreateViewHolder(ViewGroup parent, int viewType)
{
  var layoutInflater = LayoutInflater.From(parent.Context);

  switch (viewType)
  {
    // 0 corresponds to the value we chose to use in `GetItemViewType`
    case 0:
      {
        var view = layoutInflater.Inflate(Resource.Layout.MyGridViewCell, parent, false);
        var viewHolder = new MySimpleItemViewHolder(view);
        return viewHolder;
      }
    default:
      {
        return null; // this may cause you to crash if there's a type in your list you forgot about...
      }
  }
}
In this case, we just told it to inflate the MyGridViewCell we’ve been using all along, and use it and the MySimpleItemViewHolder as the ViewHolder for it.
Tweak the MySimpleItemViewHolder
We need to modify the MySimpleItemViewHolder slightly, so that it fits in with what the MyRecyclerAdapter expects. This is easy to do, we just change the parent from Java.Lang.Object to RecyclerView.ViewHolder, and add a default constructor:
public class MySimpleItemViewHolder : RecyclerView.ViewHolder
{
    public TextView DisplayName { get; set; }
    public ImageView Thumbnail { get; set; }

    public MySimpleItemViewHolder(View itemView) : base(itemView)
    {
      DisplayName = itemView.FindViewById<TextView>(Resource.Id.tvDisplayName);
      Thumbnail = itemView.FindViewById<ImageView>(Resource.Id.imgThumbnail);
    }
}
Then you can build out the the OnBindViewHolder method, which simply takes the data item at the given position, and binds the data in that item to the properties in the ViewHolder (this is exactly the same methodology as in the previous post):
public override void OnBindViewHolder(RecyclerView.ViewHolder holder, int position)
{
  var gridItem = _mySimpleItemLoader.MySimpleItems[position];

  // you could also put an 'item type' enum field or property in your
  // data item and do a 'switch/case' on that. It's less expensive
  // than reflection...
  if (holder.GetType() == typeof(MySimpleItemViewHolder))
  {
    var viewHolder = holder as MySimpleItemViewHolder;
    if (viewHolder != null)
    {
      viewHolder.DisplayName.Text = gridItem.DisplayName;
      viewHolder.Thumbnail.SetImageResource(Resource.Drawable.Icon);
    }
  }
}
And that’s it. You’re done with the MyRecyclerAdapter. Now we just have to tell the MainActivity to use the RecyclerView, tack on an ‘Infinite Scroller’ of some sort, and we’re done!
Update the MainActivity
We can chuck out just about all the GridView-related stuff (from the previous post), and swap it for the (simpler) RecyclerView implementation now.
OnCreate hasn’t changed at all, but SetupUiElements now does the following:
- Loads the items as before
- …with a very minor change which affects the
DisplayName, which I’ll come back to.
- …with a very minor change which affects the
- Instantiates a new
MyRecyclerAdapter - Instantiates a new
StaggeredGridLayoutManager(this comes in the same package as theRecyclerView), tells it that it will have two columns, and that it’s scrolling vertically (not horizontally). - Attaches the
StaggeredGridLayoutManagerand theMyRecyclerAdapterto the_recyclerView
private void SetupUiElements()
{
  _mySimpleItemLoader = new MySimpleItemLoader();
  _mySimpleItemLoader.LoadMoreItems(ItemsPerPage);

  _myRecyclerAdapter = new MyRecyclerAdapter(_mySimpleItemLoader);
  _recyclerView = FindViewById<RecyclerView>(Resource.Id.recyclerGridView);
  var sglm = new StaggeredGridLayoutManager(2, StaggeredGridLayoutManager.Vertical);

  _recyclerView.SetLayoutManager(sglm);
  _recyclerView.SetAdapter(_myRecyclerAdapter);

  // --- snip --- we'll come back to the infinite scrolling in a sec...
}
And that’s it.
This may look like a lot of code to implement, but in comparison to how it was done previously, it’s actually saved about 10 percent of the effort. And even more importantly, it’s actually more reusable than the previous version!
The last thing we have to do is implement a scroll listener for the RecyclerView. This is different enough from the previous scroll listener that you’ll need to create a new class inheriting from RecyclerView.OnScrollListener. It’s not a big deal, and as you’ll see, and it’s actually reusable too.
Adding A Scroll Listener
Create a new InfiniteScrollListener, which inherits from RecyclerView.OnScrollListener
public class InfiniteScrollListener : RecyclerView.OnScrollListener
{
    // snip private variables which are all initialised from constructor

    /// <summary>
    /// How many items away from the end of the list before we need to
    /// trigger a load of the next page of items
    /// </summary>
    private const int LoadNextItemsThreshold = 8;

    public InfiniteScrollListener(MySimpleItemLoader mySimpleItemLoader,
      MyRecyclerAdapter myRecyclerAdapter,
      StaggeredGridLayoutManager staggeredGridLayoutManager,
      int itemsPerPage,
      Action moreItemsLoadedCallback)
    {
      _mySimpleItemLoader = mySimpleItemLoader;
      _myRecyclerAdapter = myRecyclerAdapter;
      _staggeredGridLayoutManager = staggeredGridLayoutManager;
      _itemsPerPage = itemsPerPage;
      _moreItemsLoadedCallback = moreItemsLoadedCallback;
    }
}
I’ve added a constructor which brings in the objects we need. All of them are ones you’ve seen before, from the MainActivity, except for the last one, the moreItemsLoadedCallback. This is simply a method within the MainActivity which we will use to trigger a ‘data set has changed’ notification whenever the MySimpleItemLoader loads more items.
This will in turn tell the MyRecyclerAdapter to alert the RecyclerView it’s bound to, that it has more items to display, and it needs to update itself.
Yes, I know, we should also provide a callback which this scroll listener would invoke whenever more data has to be loaded, to separate scroll-listening from data-loading, but this is just an example.
Now override the OnScrolled method of the InfiniteScrollListener
public override void OnScrolled(RecyclerView recyclerView, int dx, int dy)
{
  base.OnScrolled(recyclerView, dx, dy);

  var visibleItemCount = recyclerView.ChildCount;
  var totalItemCount = _myRecyclerAdapter.ItemCount;

  // size of array must be >= the number of items you may have in view at
  // any one time. Should be set to at least the same value as the 'span'
  // parameter in StaggerGridLayoutManager ctor: i.e. 2 or 3 for phone
  // in portrait, 4 or 5 for phone in landscape, assume more for a tablet, etc.
  var positions = new int[6] {-1, -1, -1, -1, -1, -1,};

  var lastVisibleItems = _staggeredGridLayoutManager.FindLastCompletelyVisibleItemPositions(positions);

  // remember you'll need to handle re-scrolling to last viewed item,
  // if user flips between landscape/portrait.
  int currentPosition = lastVisibleItems.LastOrDefault(item => item > -1);

  if (currentPosition == 0) return;

  if (totalItemCount - currentPosition <= LoadNextItemsThreshold)
  {
    lock (scrollLockObject)
    {
      if (_mySimpleItemLoader.CanLoadMoreItems && !_mySimpleItemLoader.IsBusy)
      {
        _mySimpleItemLoader.IsBusy = true;
        Log.Info("InfiniteScrollListener", "Load more items requested");
        _mySimpleItemLoader.LoadMoreItems(_itemsPerPage);
        if (_moreItemsLoadedCallback != null)
        {
          _moreItemsLoadedCallback();
        }
      }
    }
  }
}
There’s nothing special in here, except maybe for the code which determines which items are currently visible, where they are within the entire data set, and whether it’s time to load more items. You can see the _moreItemsLoadedCallback() being invoked if more items are loaded, and we’ll hook this up in the MainActivity in a moment.
Yes, the entire block of code within
  if (totalItemCount - currentPosition <= LoadNextItemsThreshold)
  {
    // blah
  }
at the end there should probably be in a callback into the object depending on this instance of the InfiniteScrollListener, but as I said, this is just an example.
Just let it go…
Attach the InfiniteScrollListener
Back in the MainActivity, we just need to create an instance of this InfiniteScrollListener and attach it to our _recyclerView. We do this in the SetupUiElements method, so now it looks like:
private void SetupUiElements()
{
  // snip
  _recyclerView.SetAdapter(_myRecyclerAdapter);

  _infiniteScrollListener = new InfiniteScrollListener(_mySimpleItemLoader,
                                                       _myRecyclerAdapter,
                                                       sglm,
                                                       ItemsPerPage,
                                                       this.UpdateDataAdapter);

  _recyclerView.SetOnScrollListener(_infiniteScrollListener);
}
…and lastly, add the callback which will tell the _myRecyclerAdapter whenever the _infiniteScrollListener has loaded more items:
private void UpdateDataAdapter()
{
  int count = _mySimpleItemLoader.MySimpleItems.Count;
  Toast.MakeText(this, string.Format("{0} items", count), ToastLength.Short).Show();
  if (count > 0)
  {
    _myRecyclerAdapter.NotifyDataSetChanged();
  }
}
And that’s it. A staggered grid layout, with infinite scrolling. Hooray! :)
Oh yeah. Last thing. I mentioned that I’d made some changes to the MySimpleItemLoader implementation to make the items different sizes, this forcing the grid to lay out in a staggered fashion.
All I did was add some random-length lorem ipsum text to each item’s DisplayName property, along with the item number.
private readonly string[] _lorem = "Lorem ipsum dolor sit amet, consectetur adipiscing elit.".Split(' ');
private readonly Random _rand;

// constructor now looks like
public MySimpleItemLoader()
{
  MySimpleItems = new List<MySimpleItem>();
  _rand = new Random();
}

// and LoadMoreItems now looks like
public void LoadMoreItems(int itemsPerPage)
{
  IsBusy = true;
  for (int i = CurrentPageValue; i < CurrentPageValue + itemsPerPage; i++)
  {
    string randomLorem = string.Join(" ", _lorem, 0, _rand.NextInt(_lorem.Length - 1));
    MySimpleItems.Add(new MySimpleItem(){DisplayName = string.Format("This is item {0:0000} ({1})", i, randomLorem)});
  }
  // snip
}
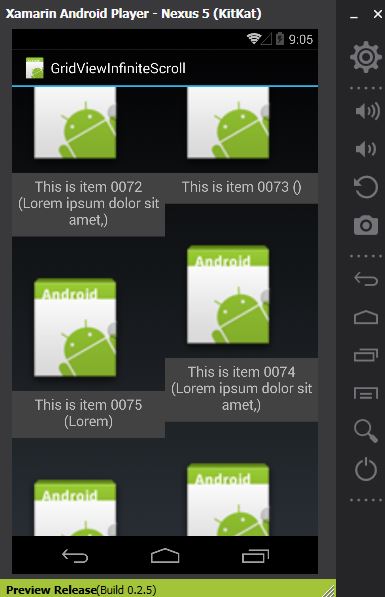
So what does it look like?
It’s a little clunky, because we’ve not decorated it with cool images, and it could do with a bit of margin and padding love, but here it is, in the Xamarin player emulator:

Source Code
The source code for the app in this article is over on GitHub. Note that it’s in a staggered-grid branch of the orginal, next to the add-viewholder, branch from the previous post. I did it this way so that you can refer to all three, and compare the differences between them.
References
Some references you may find useful:
- Previous post on implementing on enhancing load/scroll performance
- Pinterest, because staggered grid layout
- RecyclerView
- RecyclerView.Adapter
- RecyclerView.LayoutManager
As always, all my source code for these articles is released as OSS under the MIT license, so feel free to use it any way you like. I hope it helps you!